

If you haven’t read part I of this review, we suggest you go back and read it, as this is a continuation of our projector comparison. Click here to go back to Part I.
Contrast & Black Levels
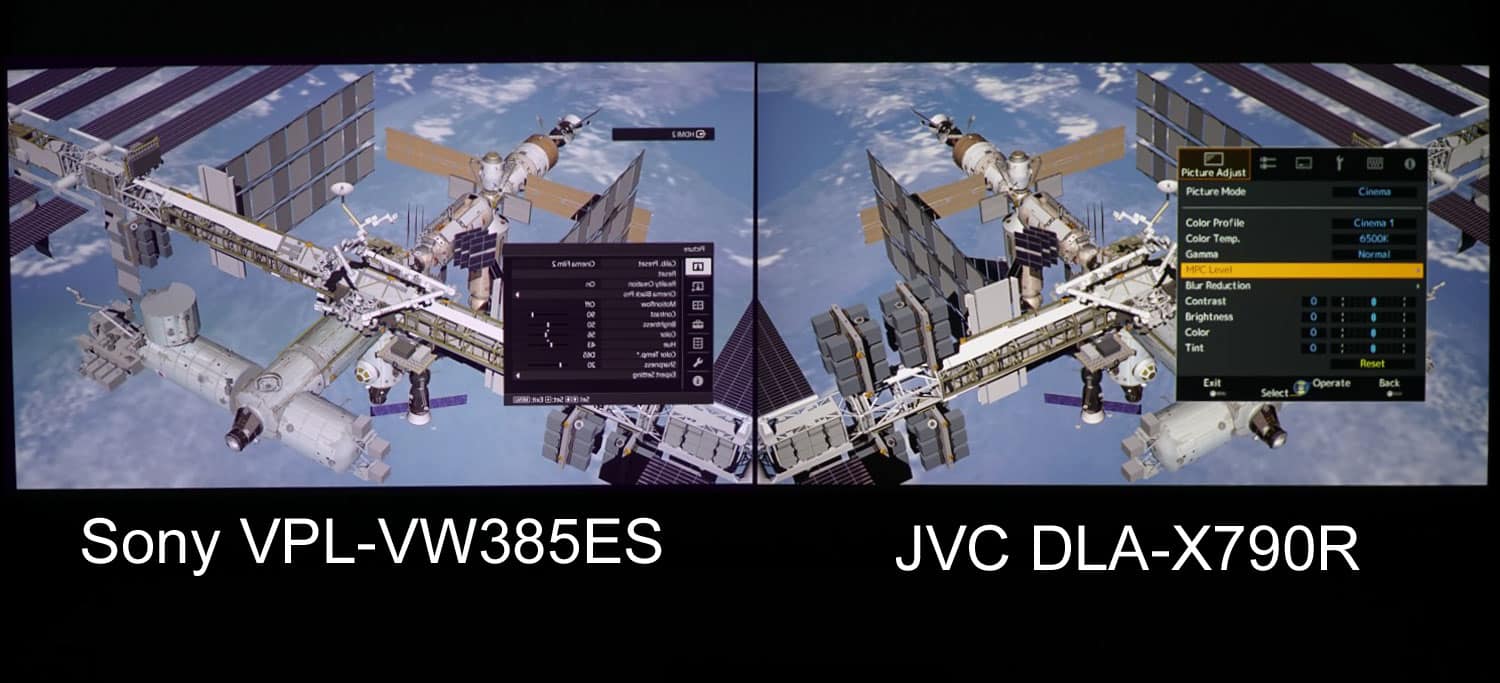
One of the challenges with making online comparisons is the lack of references or standards when it comes to black levels and the myriad of contrast methods and measurements which are impossible to compare from manufacturer specifications. In order to allow better evaluation between manufacturers and to give us some idea of where the black levels really fall we have developed some fixed test signals which allow us to not only give numerical values to black levels, but also better compare one projector to another and overall contrast. The other challenge is that there are multiple menu settings and adjustments which interact with each other, so trying to get the best blacks can also reduce the overall brightness and really affect the HDR range as well. In the case of the Sony, the VPL-VW385ES has three main iris settings and also a “brightness” setting. If you decrease the iris brightness setting to minimum you definitely improve the blacks, but you give up a lot of brightness to do so. In our comparison video we show some of these settings and their effects so you can get an idea of how much control you really have.
In the case of JVC’s DLA-X790R, if you place their iris in the manual mode, and if you turn the iris way down, likewise, you improve the blacks but again, give up brightness to do so. In our comparison video we show you both the optimized settings we used and also some of the other settings that affect black levels as well. For this blog we used the optimized settings we found which seemed to give the best balance of good blacks and good brightness. Fortunately, the results in comparison to each other turn out the same regardless of whether you use the optimized, or the very best blacks at a sacrifice of brightness, as you will soon see.
Pure Black
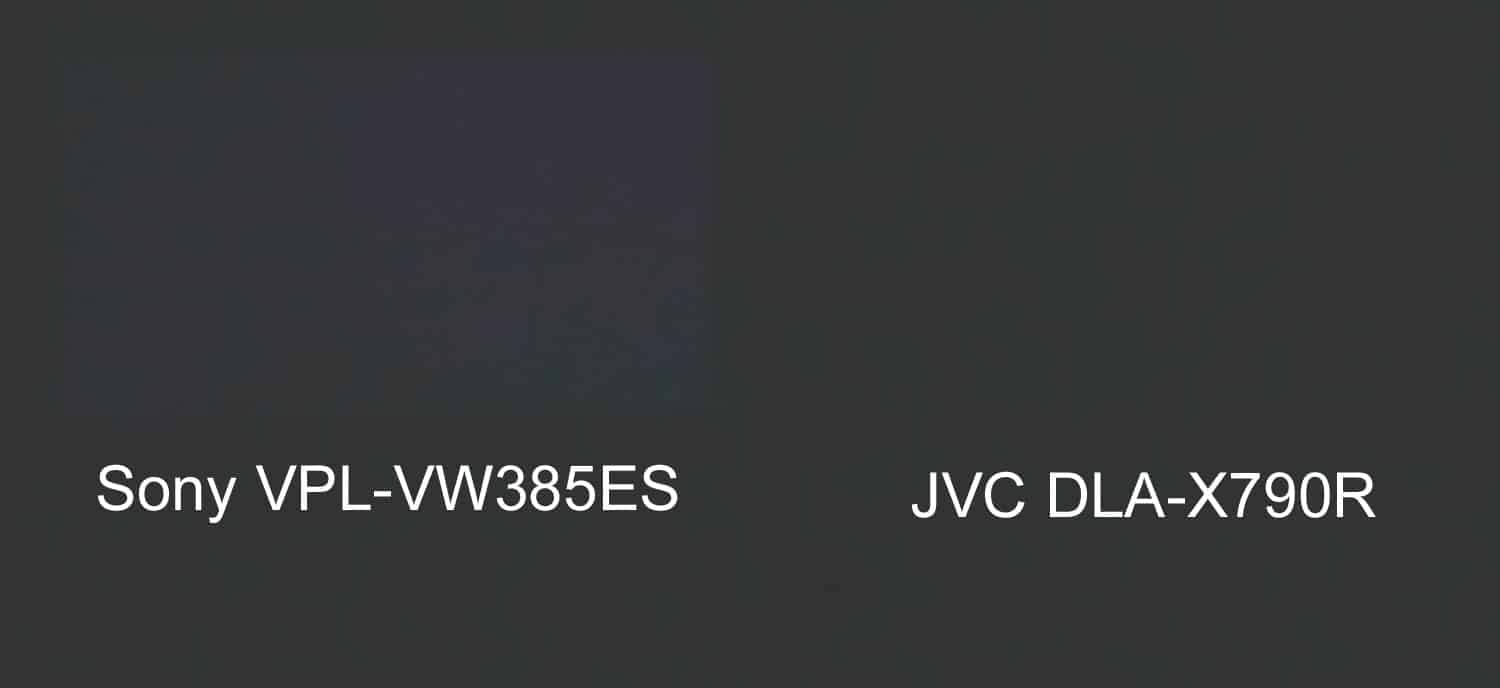
If you look carefully (you may need to adjust your display’s brightness) you will see the Sony is not quite equal to the near- zero black of the JVC on the right.
Our “Pure Black” test is the 0IRE of a test signal of a generator or set up disc like the Spears & Munsil HD benchmark Blu Ray disc. It is not the same as nothing with no input but is the blackest that a display can display with a a scene that includes the deep black of 0 IRE, which is the deepest black that a video display is capable of displaying when it is set up properly. In this case we had the JVC DLA-X790R in the Auto iris 1 position and the Sony VPL-VW385ES in the Full or darkest iris setting along with the iris brightness set to its minimum position.
Near Black
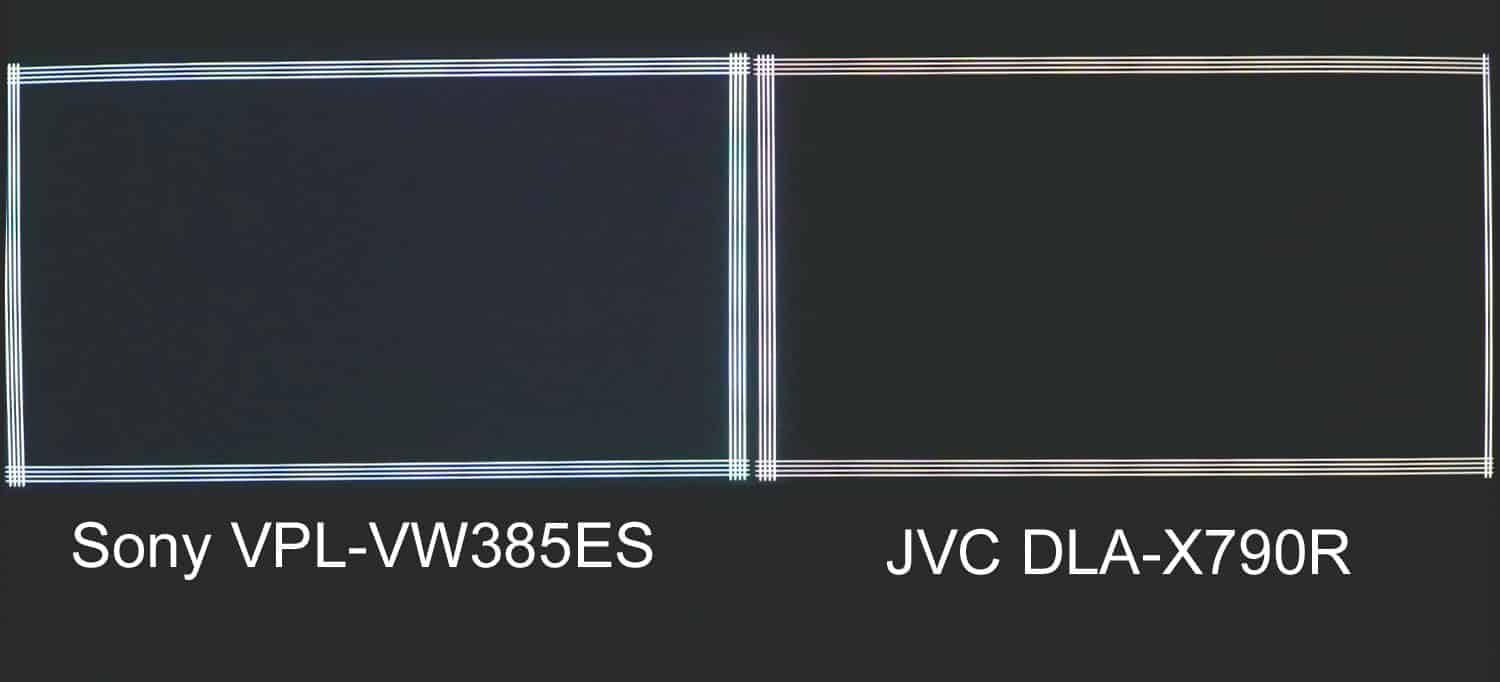
“Near black” with thin white lines requires the projector to open its iris to be able to display the fine frame. Look closely and you will see that the JVC again comes out as having the deeper blacks.
The “Near Black” test signal forces the projector to open its iris wide enough to show the detail of the thin lines and is a better indicator of what most scenes would show in terms of deep blacks with some light areas on the screen. Even when we turned the iris brightness on the Sony all the way down and the white lines were very dim, its black could not match the deep blacks of the JVC.
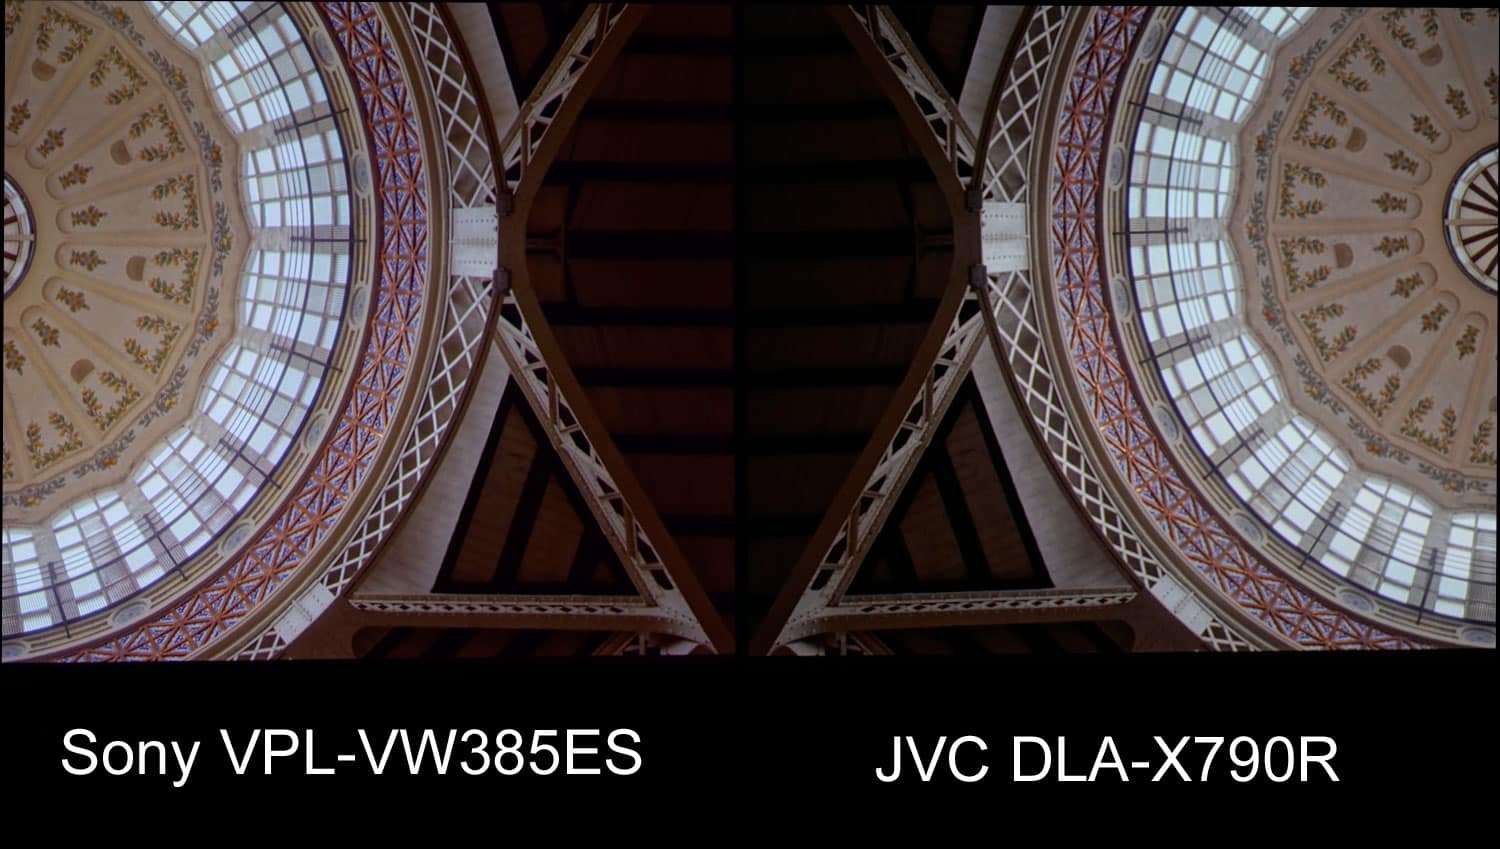
Semi Black
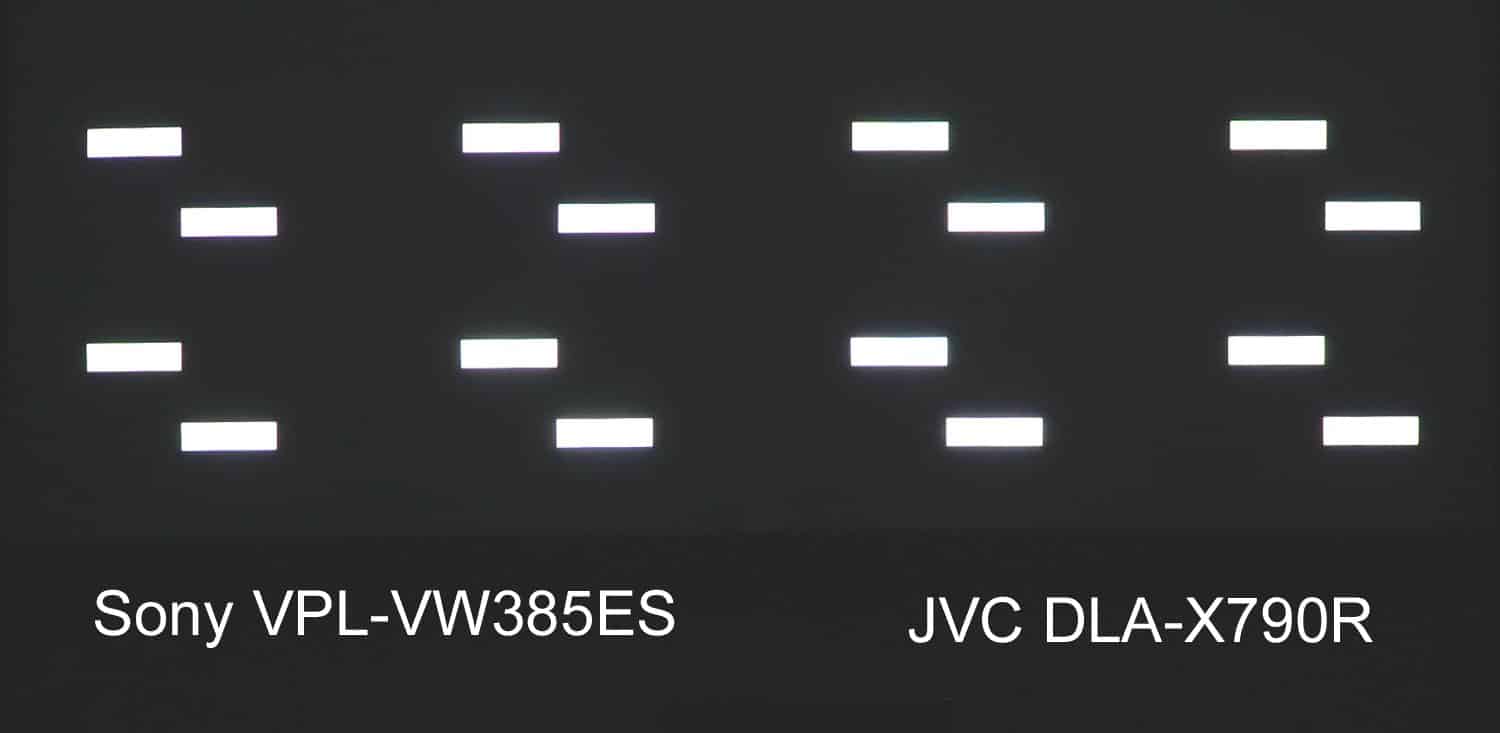
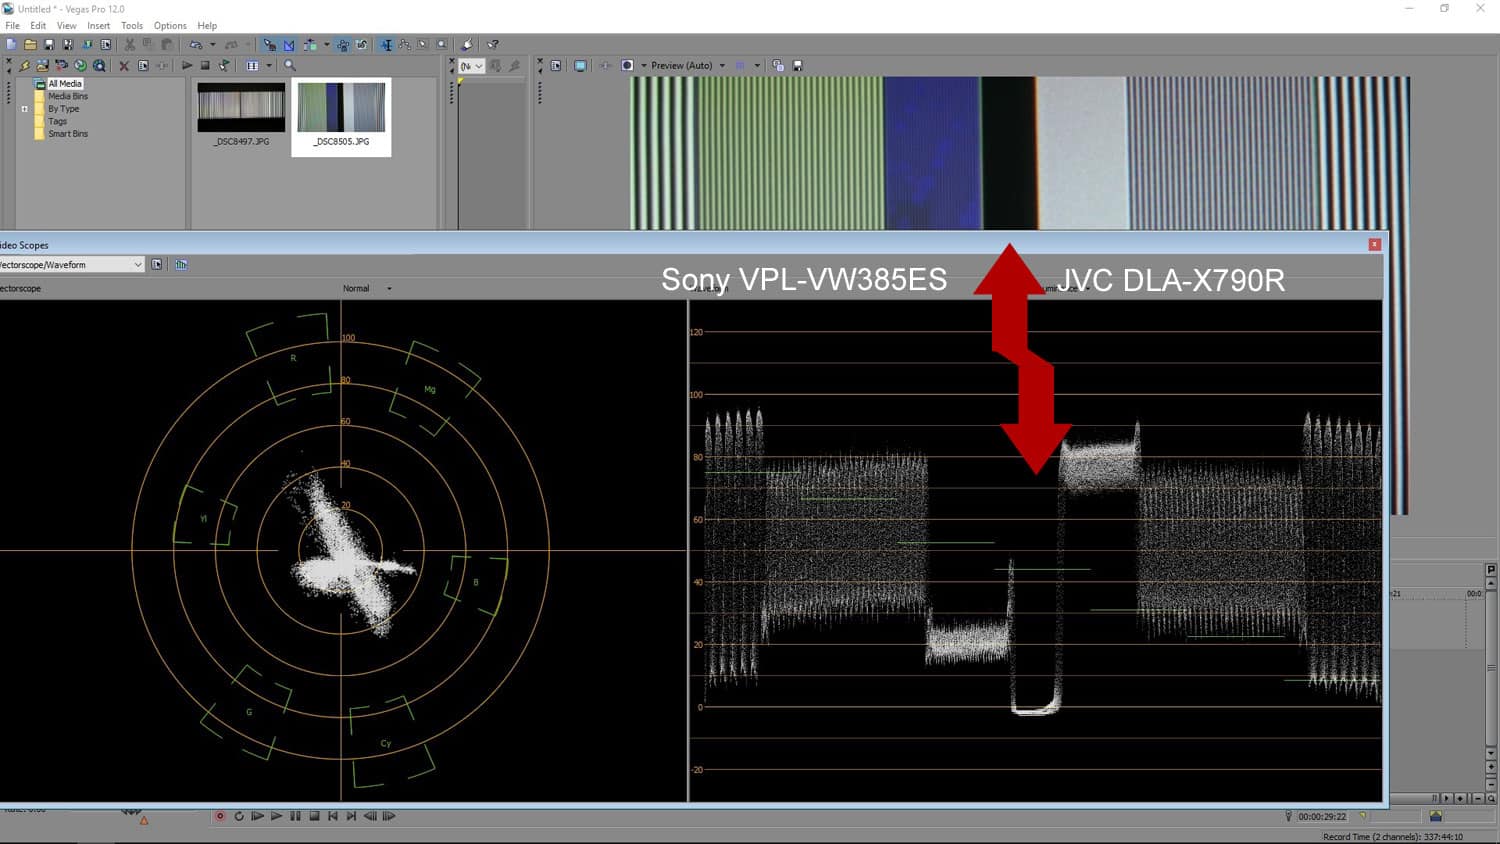
As the projectors try and reproduce more of the brightness in the squares the iris is now completely open as far as the dynamic or active iris is concerned.
Unlike the ANSI contrast grid, which has equal squares of bright and dark squares, this test signal is still mostly black with a few white highlights. While some may say this is not a realistic test, if you are interested in HDR performance it is very relevant. The whole idea of HDR is that we want to see the wider rage of dynamics and contrast from deep blacks to the brightest highlight and everything in between. Although we will look at 4K HDR scenes a little later on, this test gives us an idea of what we can expect and certainly gives us an idea of the native or maximum contrast each projector is capable of. In this case what you cannot tell from these photos is the relative brightness of the white squares: the JVC squares with its higher brightness capability has significantly brighter squares. So even though the blacks in this case are almost the same, the contrast on the JVC still is better due to the higher brightness of the white areas.
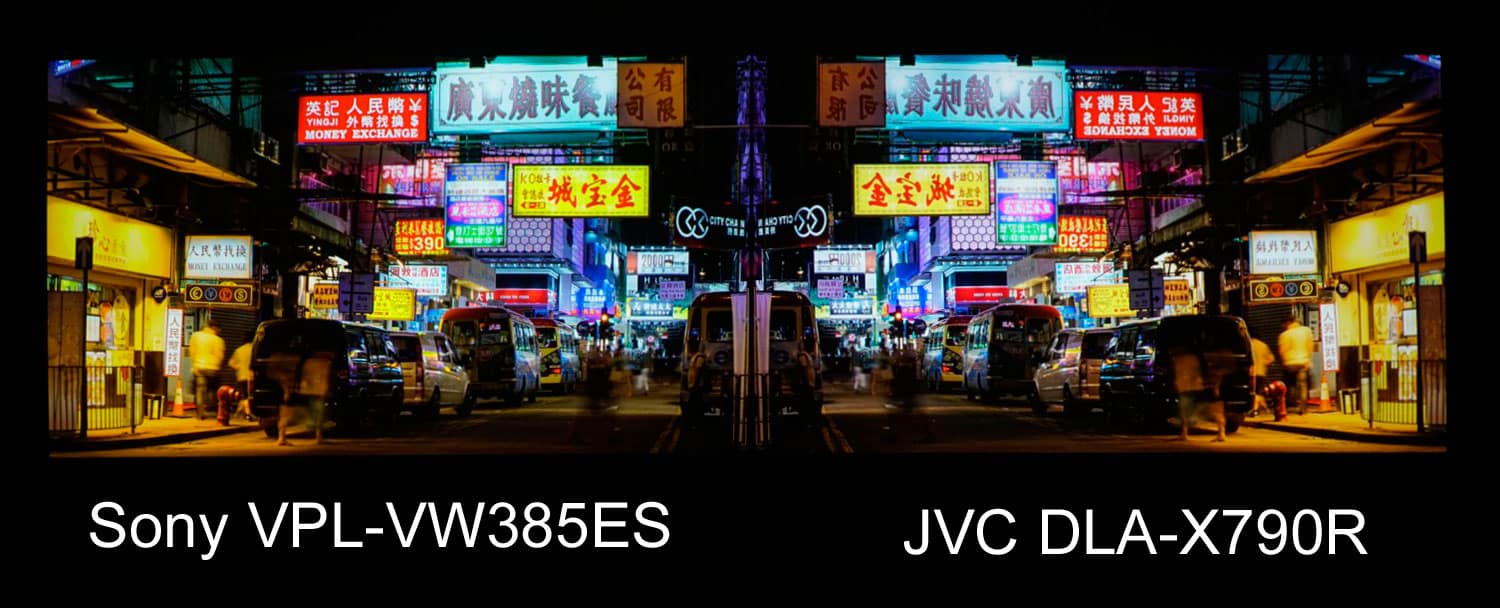
In this scene from the Extron Shootout disc it is possible to see the results of the higher contrast that the JVC DLA-X790R is able to display. Notice the whiter whites and the slightly deeper blacks – which gives more depth to the image.
Contrast Conclusion
When it comes to deep blacks and contrast, JVC is still the reigning champion. The Sony is close, but at this price level in the Sony line it cannot equal the JVC.
fc = foot candles (the smaller the foot candle measurement the darker the black)
| Pure Black | Near Black | Semi Black | At Screen /Real Contrast |
Lumens (Hi-Mode) |
|
| Sony VPL-VW385ES | .01 fc | .07 fc | .18 fc | 345: 1 | 1,190 |
| JVC DLA-X790R | Below meter capability | .02 fc | .15 fc | 460:1 | 2,064 |
4K Detail
This is a subject of great debate as there are those that say unless it is native 4K UHD it is not true 4K . The Sony is a true native 4K projector with 4096 X 2160, while the JVC is “3840 X 2160 Precision via e-shift5 technology.” What does that mean? This is JVC’s 5th generation of shifting pixels to reproduce the 4K UHD signal as close as possible using 3 native 1920 X 1080 pixel DLA imaging devices.
In this close up of both projectors with a 4K input, the detail and sharpness at a viewing distance of 1.5x the screen height, both are sharp and have excellent detail. Click on the image to see at a much larger size.
Several technical reviews seem to suggest that while the JVC is not native its detail and sharpness are very close to the Sony. We decided to dig deeper in this comparison to see if that is justified. In this next image you will see a wide shot of both projectors on the same scene with one of them with the image reversed so we can see a closeup of the same information. The source is 4K UHD but not HDR 4K material.
At normal viewing distance (click image to enlarge) both the JVC and Sony are sharp and detailed.

At a distance of less than 1 foot from the screen, it is possible to begin to see the very fine differences in actual detail. If you look closely in the circled areas you will see the differences in additional detail between native 4K and JVC’s 4K e-shift5 technology.
Lastly, we decided to compare computer images since they tend to use more single pixel lines to show text and graphics. We wanted to see how much difference there would be between the 4K video sources and the computer signals since the computer uses higher rise times and transition contrast than most video images.
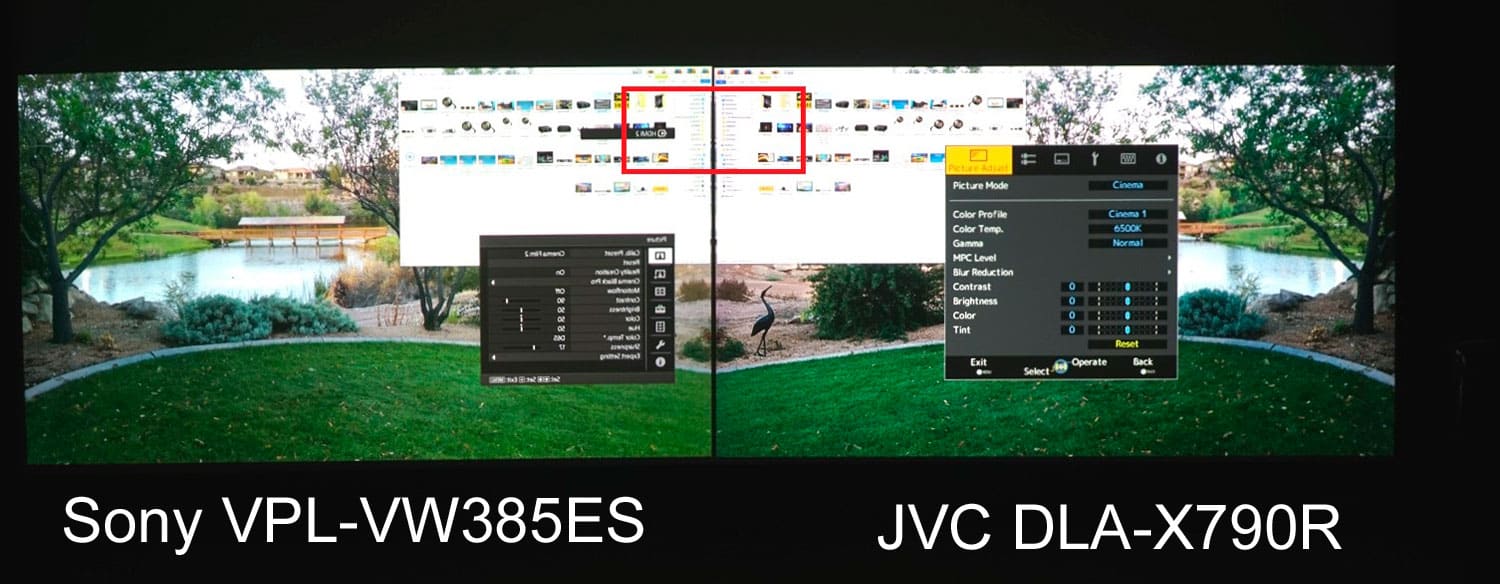
The area in the red square above is what is displayed below so that a close examination of the 4K detail can be compared.
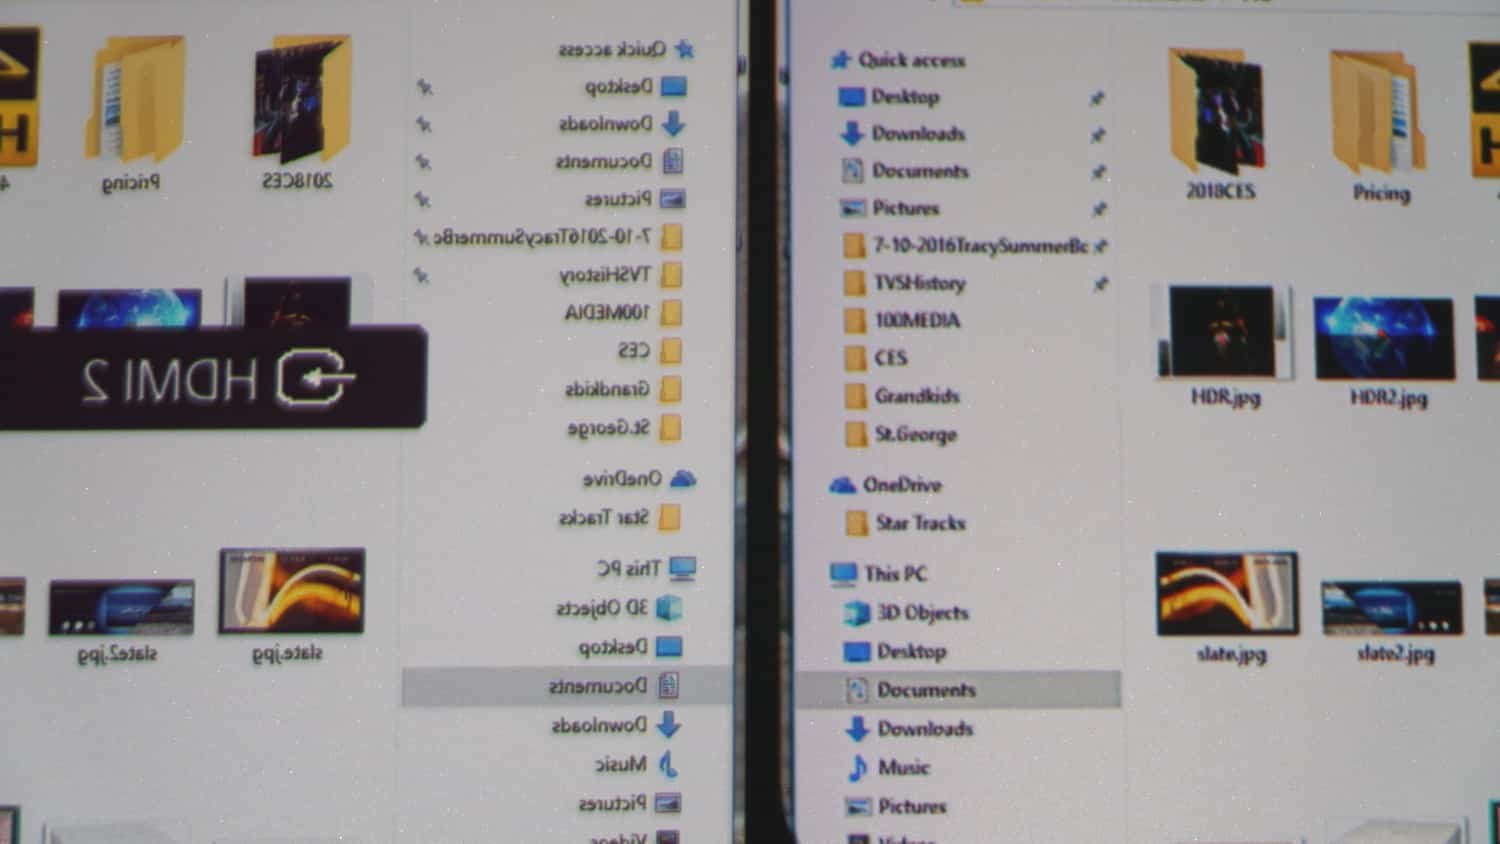
Here you can definitely see the difference between native 4K and the e-shift5 technology. This difference is really only detectable at closer than normal viewing distances as you can see from the above red square area wide view.
Detail Conclusion
The Sony, with its native 4K SXRD chip, is, without question, able to resolve more detail in a 4K image source than the JVC. The difference, however, is not detectable in this case at normal viewing distances as the e-shift5 technology does an amazing job of getting the detail and sharpness to compare very well on most 4K sources. For those who understand multibust and the depth of modulation comparisons here is the result:
Here on the right side of this dual scope display, you’ll see the Sony image on the left and the JVC image on the right of the thick black vertical bar. Below it shows the waveforms for the corresponding projector images. As you can see, the black bar correlates to the lowest dip you see in the waveform. You can see how close they are in their depth of modulation due to the lower level of the high frequency detail on the left side of the lowest dip (which is the highest frequencies of the Sony). As the black becomes blacker and the white becomes lighter, the spread or width of the waveform increases and it is more visible to the eye.
4K HDR Performance
For many it’s the HDR part of the 4K experience that really makes it exciting and worth the added investment. Some people are not even aware of, or care about, the extra pixels, but they can see the additional color and dynamic range that a good 4K HDR image can produce. One of the challenges for projectors is that there are no projection HDR standards as of this review. The challenge is that our eyes perceive brightness and dynamic range in a slightly different way if we are in a dark theater. Our eye sensitivity actually increases due to a chemical in the eye; it is called the Rhodopsin Effect. Our sensitivity to light can increase as much as 30 stops compared to outside bright light. This chemical burns off as soon as we expose our eyes to bright outside light. That is the reason our eyes hurt when we leave a dark theater and go outside to bright sunlight. What needs to be worked out is what is the needed brightness for a projector (along with its black capability) to equal the HDR 14-16 stops when our eyes are under this Rhodopsin effect. After seeing projectors that can go from near perfect blacks to close to 3,000 lumens, I have found that even that for my eyes it is very dramatic and about as much as I really want to see in the dark. Some have even suggested that about 70 foot candles on the screen for HDR would be ideal. For now, we’ll take what we can get and focus more on the color and the tone mapping of the HDR signal as it is getting very exciting.
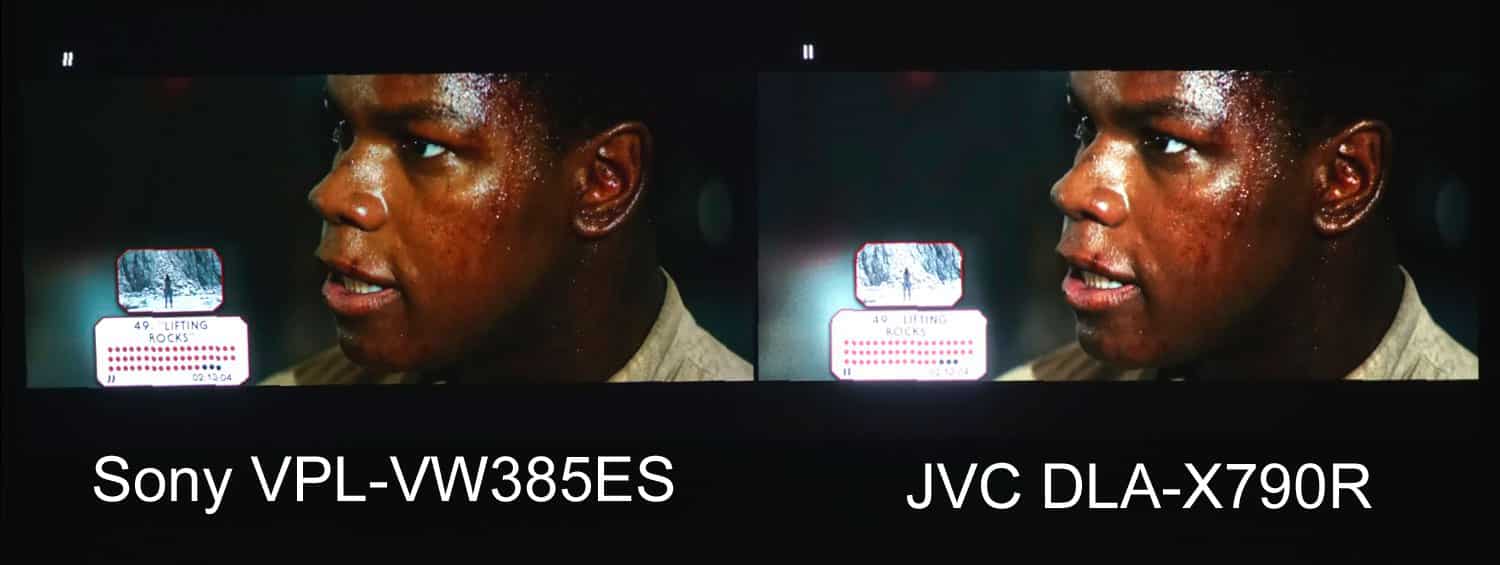
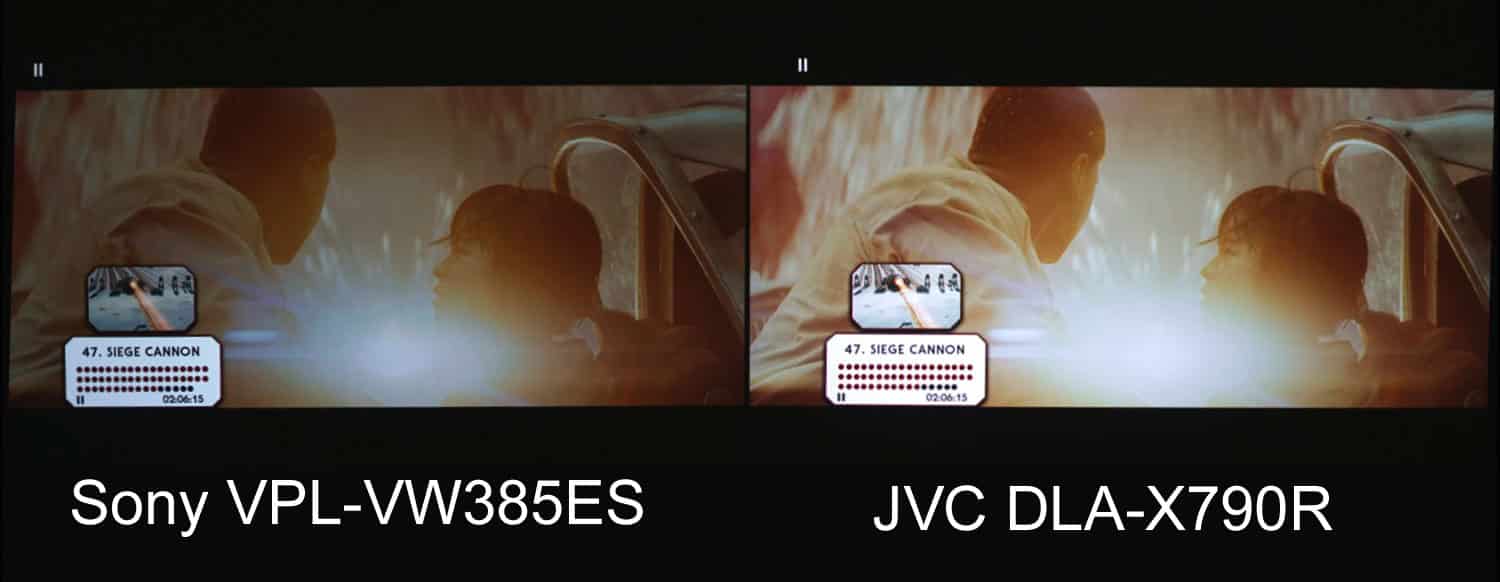
In this scene from “The Last Jedi” you can see the relative brightness difference in the projectors as well as some differences in their tone mapping. Note: The chapter identification is slightly over exposed due to the brightness difference picked up by the camera. Both images are very sharp.
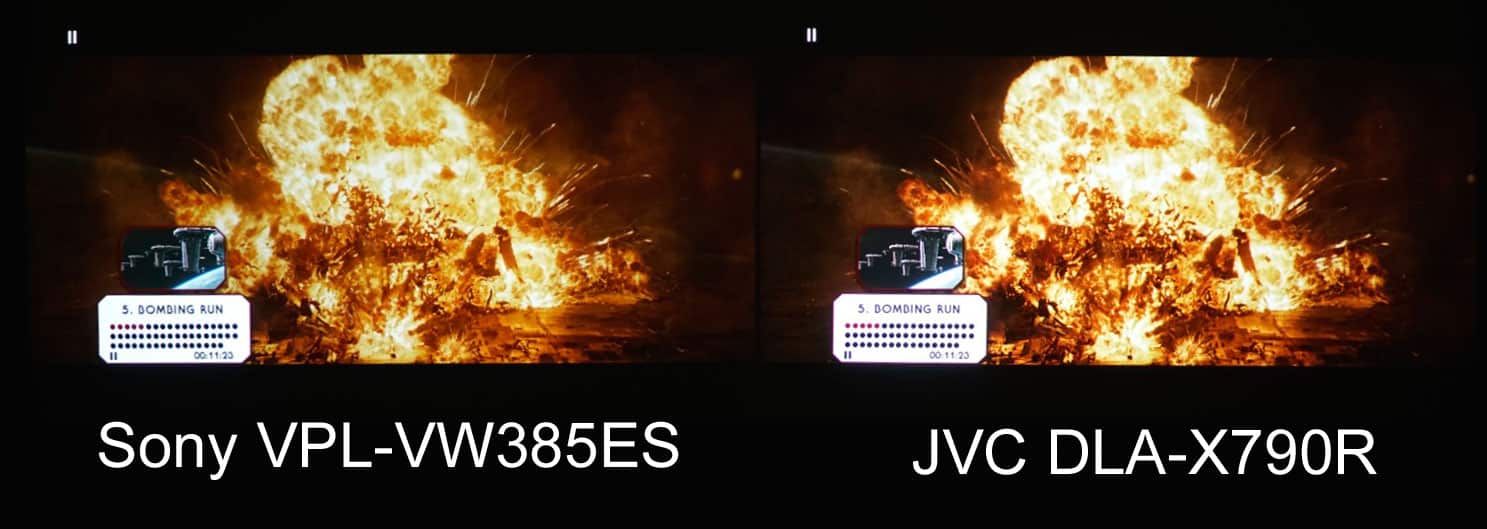
In this explosion, that pushes the max brightness of the projectors, you can see how the slightly better blacks of the JVC give the image more depth while the Sony tone mapping gives slightly more detail in the highlights
HDR tone mapping is what each manufacturer must do when they receive an HDR 4K signal. Since no current projector can actually display 100% of the wide color gamut of REC2020 they need to decide and program their projector to map or select from the colors they can do what to do with the REC2020 color they are receiving. The other, and even more difficult challenge, is how to best display the dynamic range that they are capable of from the wide dynamic range that they are receiving from the source material. Each manufacturer must choose how they feel their product will best give, create, or display the HDR and color range.
this example, the Sony is choosing to map conservatively so more details in the bright areas are seen while the JVC chooses to use its brighter capability to make impressive dynamic range.
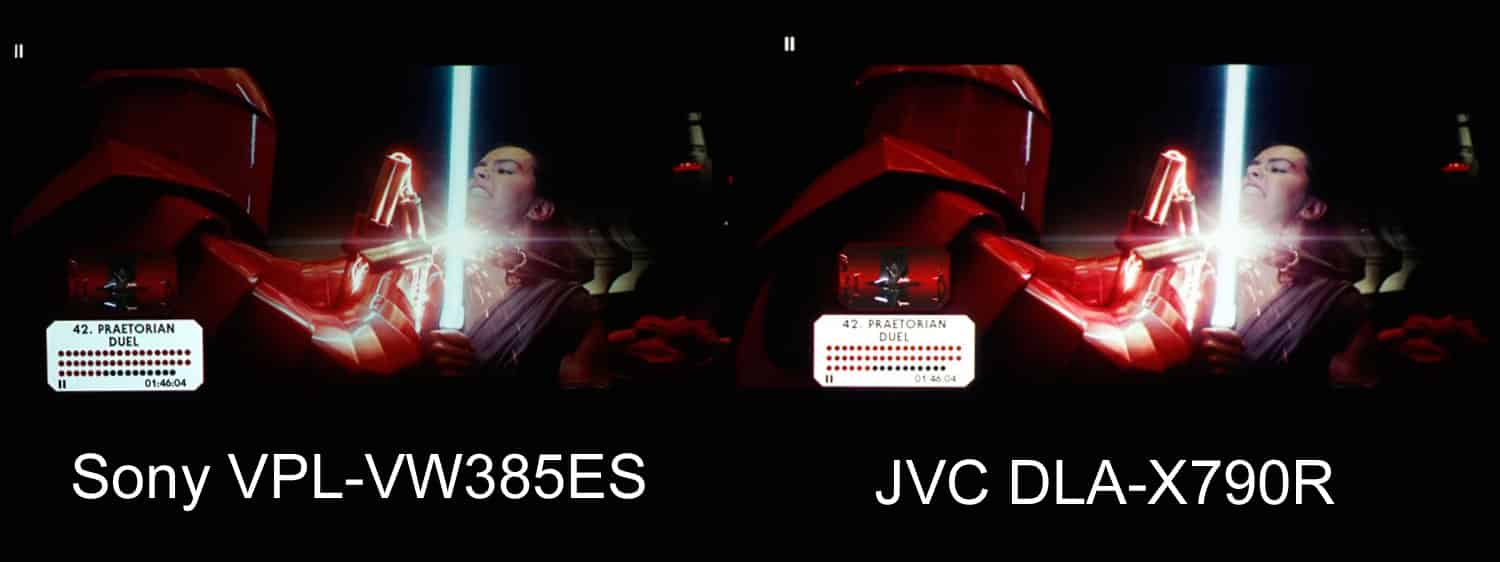
In this last HDR scene we will discuss the differences in tone mapping which are very evident in this scene. It is not just the higher brightness, but the level at which the brightest parts of the image will be clipped, that makes them so different. If you allow more of the brightness to come through, then you may begin to cut out some of the fine detail in the highlights. Each projector has some adjustment in the HDR mode to help compensate for this balance. In the case of the Sony VPL-VW385ES, we have set the HDR brightness to its highest level and yet you can still see very good detail in the highlights. The JVC DLA-X790R, in this example, has chosen to use as much brightness as possible even if it means clipping some of the fine high brightness details. Which one do you think is better? Click on the image below and see if you can see what we are discussing. Also, look at the video of this comparison for some full motion comparisons and differences.
Here is the challenge of HDR tone mapping. Which is better? The higher detail of the Sony on the left or the higher brightness of the JVC on the right. Separately each is very dramatic and exciting. Side by side you can see the dilemma: brighter or more technically correct? The Sony is in its brightest HDR setting for HDR contrast.
As you can see from the image above, it is not just the brightness of the projector but how the manufacturer chooses to display the HDR signal. Even though the JVC in this case is brighter, they could have chosen to display more of the near highlights or lowered their clipping levels and near peak gradation curves (dynamic gamma), but then the overall effect may not be as dramatic.
HDR Conclusion
Even though the Sony is technically handling HDR more accurately near the highlights, the additional brightness and color that you can see with higher clipping levels of the JVC is very dramatic when it comes to explosions and overall scene brightness. For myself, I actually prefer the JVC HDR, but it is very subjective so each person needs to decide what they prefer in their HDR experience.
Final Conclusions
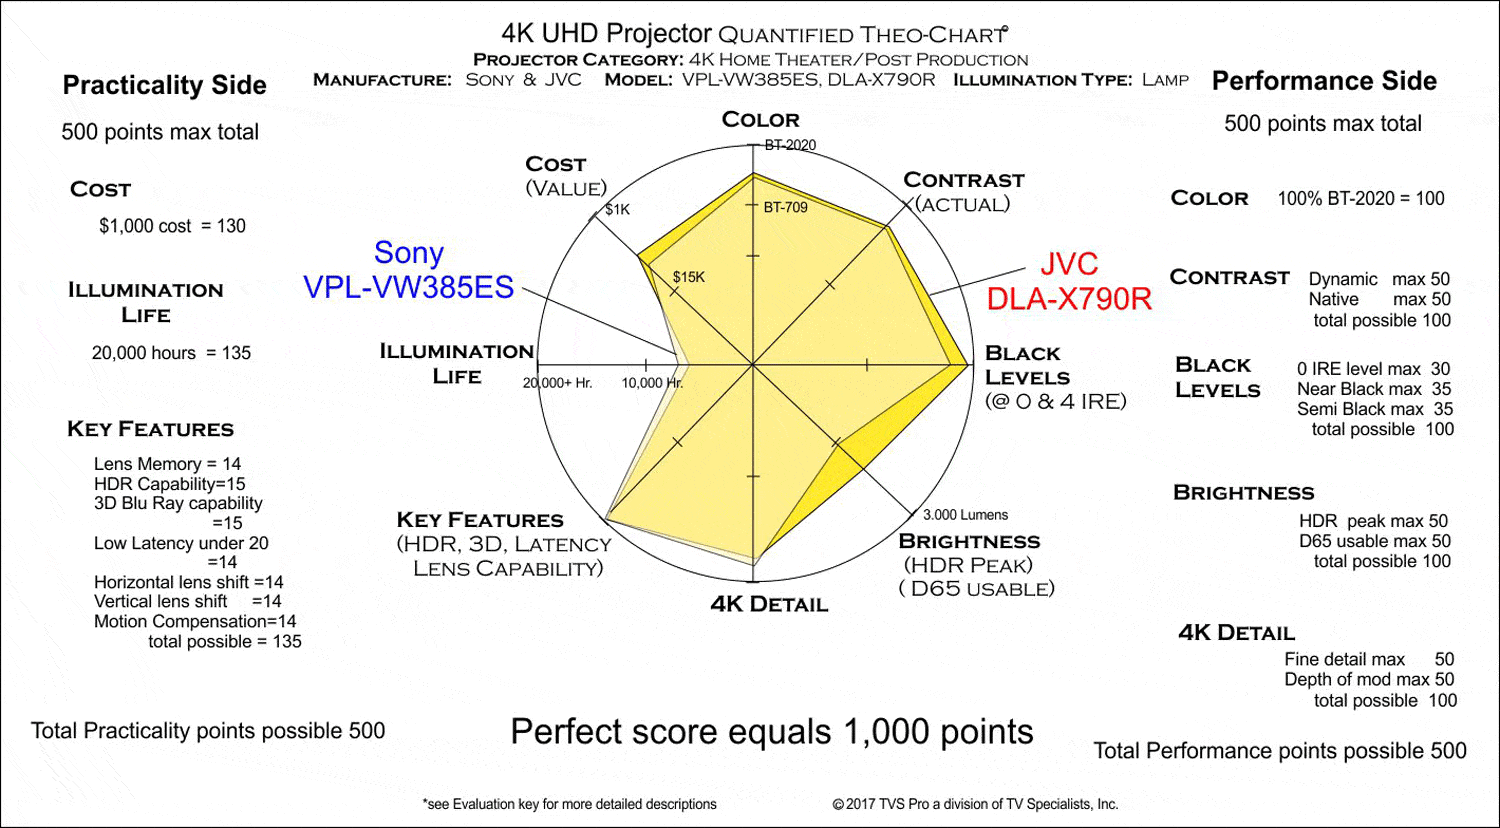
As is usually the case for two very competent and refined competitors, there is not a simple clear-cut winner. Each projector has a very rich lineage and are both refined products with a very extensive feature list. What is very apparent, however, is that the JVC does have the better blacks and higher brightness, while the Sony has the edge in actual image detail and technically more-accurate tone mapping in HDR content. Below is the superimposed Quantified Theo Charts which allow an overall view of how the projectors compare to each other in both performance and practicality – and how they stack up.
Here is the video comparison on YouTube:
So now you’ve seen and heard what we’ve discovered and what our own opinion is, but what do you think based on the images given?


0 Comments